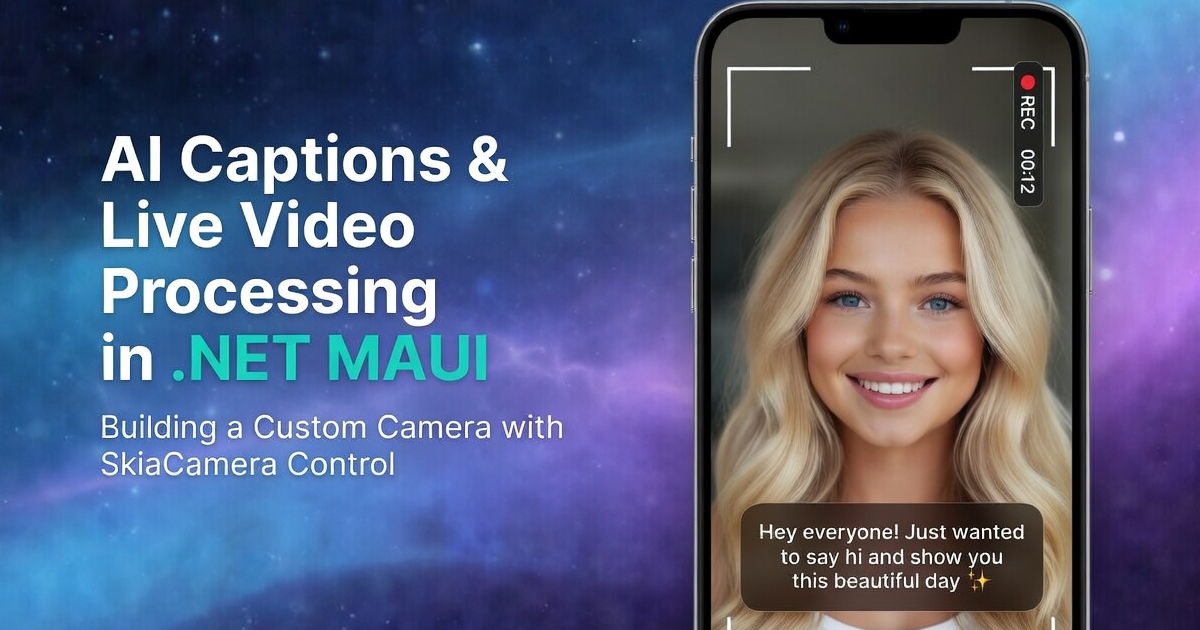
AI Captions and Live Video Processing in .NET MAUI
How to use SkiaCamera control in .NET MAUI for a video processing pipeline with AI captions, live overlays, audio processing, and look-back capture during recording.
DrawnUi.Maui.Camera
If you just need camera capture in .NET MAUI, there are solid options already: CommunityToolkit.Maui.Camera, MediaPicker, and platform-native APIs.
For the other kind of job: when preview and recording are part of a realtime pipeline, and you want to process frames before they hit the encoder, meet DrawnUi.Maui.Camera.
Best for:
- Live preview processing effects, sending to AI/ML
- Captured hi-res photo post-processing
- Processing video in real-time before encoding
- Audio live processing
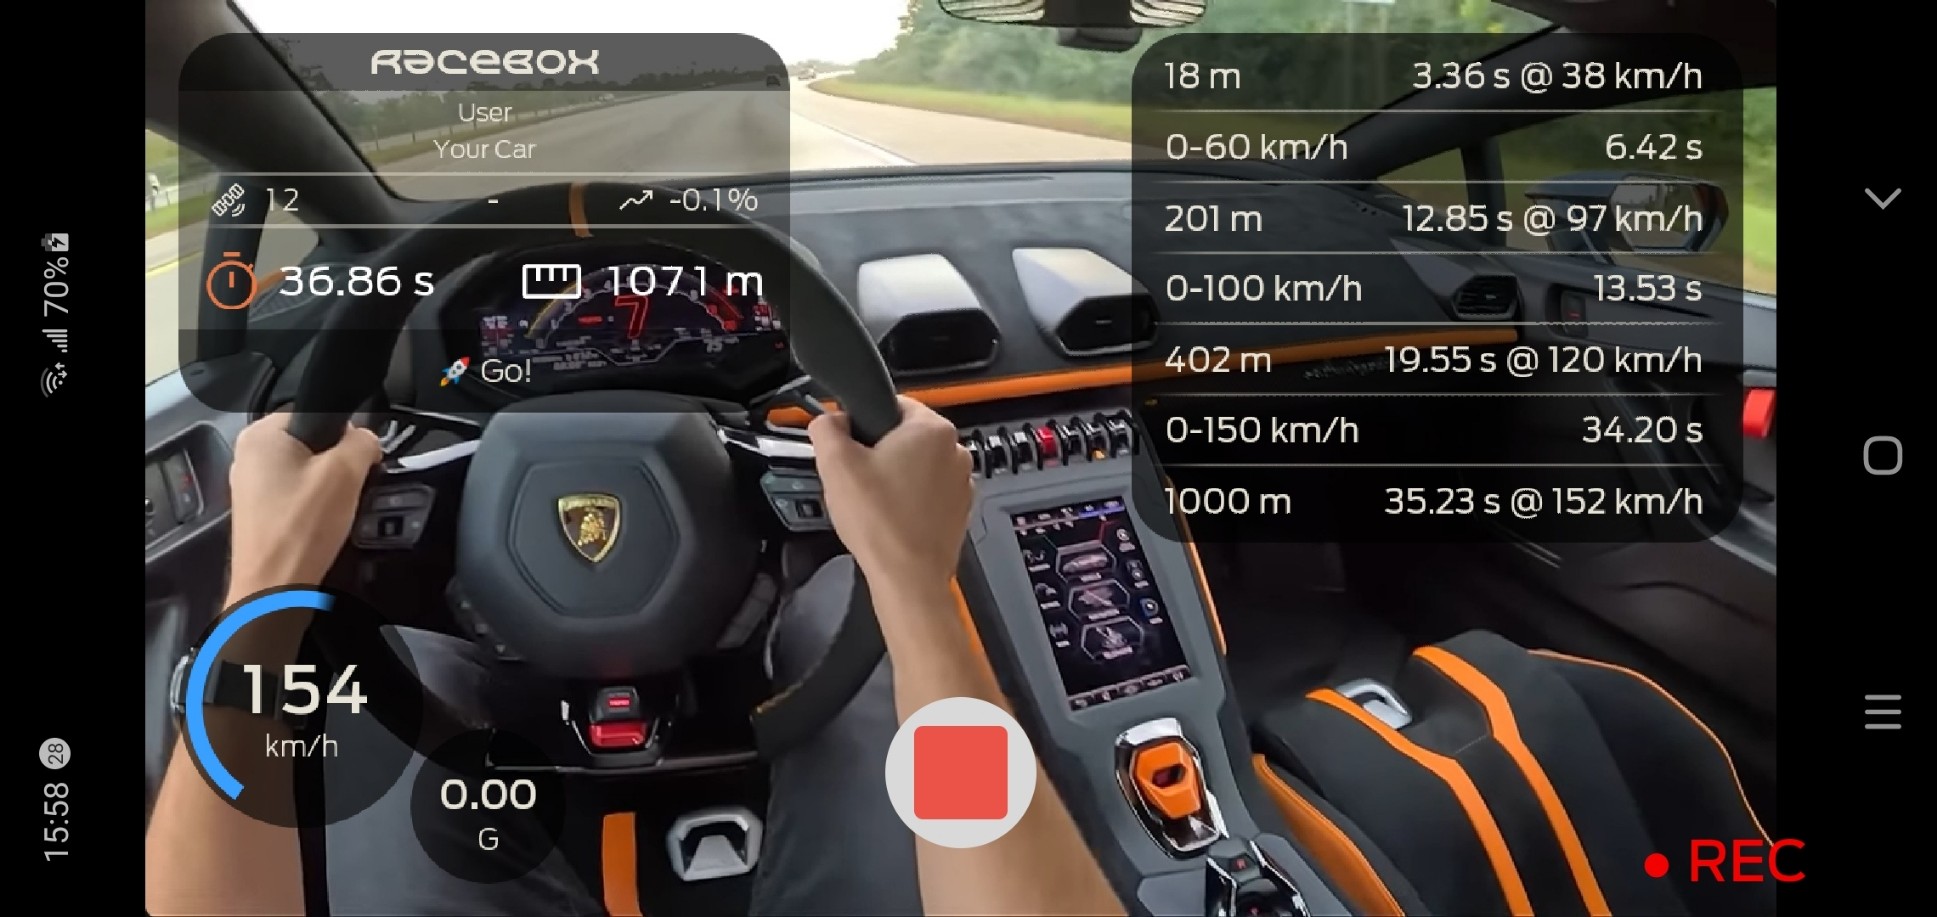
Use case: a published .NET MAUI Android app recording video with encoded overlay in real-time.
Package provides a SkiaCamera control with hardware-level options such as stabilization, audio modes (raw, voice, and more), and flexible processing hooks. It is MIT-licensed and supports iOS, MacCatalyst, Android, and Windows.
It is powered by SkiaSharp and built for realtime feed processing and post-processing. The project started with native filters on Android (RenderScript) and iOS (Metal), then moved to SKSL once SkiaSharp hardware acceleration on Windows became practical. That shift made one cross-platform processing path realistic for video and audio workflows.
What this article covers
We will focus on the control installation and the sample app which comes along with the git repo, with demonstrated features:
- Overlays and shader effects rendered into the encoded file and over preview
- OpenAI-powered real-time captions burned into output
- Live video processing, SKSL shaders
- Pre-recording (look-back capture)
For a quick visual pass you can run the sample app on mobile or even your Windows or Mac machine if you have a camera attached!
The previous article covers the audio processing side of the pipeline.
Recorded video on iPhone with Noir filter and encoded realt-time EQ and AI-captions
Control Setup
Full control docs entry point is the project README.
To use SkiaCamera in a .NET MAUI app, install the package, initialize DrawnUI, then host the camera inside a hardware-accelerated Skia canvas.
Install:
1
dotnet add package DrawnUi.Maui.Camera
Initialize
Inside MauiProgram.cs:
1
builder.UseDrawnUi();
Consume
Place inside your page, for example:
1
2
3
4
5
6
7
8
9
10
11
12
13
14
15
16
17
18
19
xmlns:draw="http://schemas.appomobi.com/drawnUi/2023/draw"
xmlns:camera="clr-namespace:DrawnUi.Camera;assembly=DrawnUi.Maui.Camera"

<Grid VerticalOptions="Fill" HorizontalOptions="Fill">
	<draw:Canvas
		HorizontalOptions="Fill"
		VerticalOptions="Fill"
		RenderingMode="Accelerated"
		Gestures="Lock">

		<camera:SkiaCamera
			x:Name="Camera"
			HorizontalOptions="Fill"
			VerticalOptions="Fill"
			BackgroundColor="Black"
			CaptureMode="Video" />

	</draw:Canvas>
</Grid>
Important:
- Keep the container stable: no
Autorows, no unset width or height requests without aFill. - For reliable saved feed orientation, lock the app or the camera page to portrait. The UI can still react to landscape rotation, and we will do that below.
UI Orientation
By default MAUI apps rotate Ui upon device orientation, but camera encoder expects a stable orientation. Lock the whole app to portrait at the platform level, then use DrawnUI’s rotation event to rotate individual icons in response to device tilt - same as a native built-in camera app, without letting the layout flip.
Android - MainActivity.cs:
1
2
3
[Activity(Theme = "@style/Maui.SplashTheme",
    ScreenOrientation = ScreenOrientation.SensorPortrait,
	...
iOS - Info.plist (iPad needs UIRequiresFullScreen or the App Store may require landscape support):
1
2
3
4
5
6
7
8
9
10
11
<key>UIRequiresFullScreen</key>
<true/>
<key>UISupportedInterfaceOrientations</key>
<array>
	<string>UIInterfaceOrientationPortrait</string>
</array>
<key>UISupportedInterfaceOrientations~ipad</key>
<array>
	<string>UIInterfaceOrientationPortrait</string>
	<string>UIInterfaceOrientationPortraitUpsideDown</string>
</array>
In our sample app we respond to device rotation by rotating app icons from a DrawnUI event:
1
2
3
4
5
6
7
8
9
Super.RotationChanged += OnRotationChanged;

 private void OnRotationChanged(object sender, int rotation)
 {
     var iconRotation = -NormalizeIconRotation(rotation);
     _buttonSettings.Rotation = rotation;
     _buttonFlash.Rotation = rotation;
     _buttonSelectCamera.Rotation = rotation;
 }
Permissions
Set platform native permissions as documented in the README. Then optionally define flags so the control can request them automatically:
1
2
3
Camera.NeedPermissionsSet = NeedPermissions.Camera
    | NeedPermissions.Gallery
    | NeedPermissions.Microphone;
Power On/Off
Camera power is controlled by the bindable IsOn property. Turn it on when needed, for example after the first canvas draw:
1
2
3
4
5
6
7
8
9
10
11
12
13
// can attach this event handler in XAML too
Canvas.WillFirstTimeDraw += (sender, context) =>
{
	if (CameraControl != null)
	{
		//delay camera startup to avoid too much work when starting up
		//and let the first screen render faster
		Tasks.StartDelayed(TimeSpan.FromMilliseconds(500), () =>
		{
			CameraControl.IsOn = true;
		});
	}
};
If you have a dedicated camera page, you can also flip IsOn from your page lifecycle hook. The exact hook depends on your navigation setup.
When the app goes to background, camera state is suspended and restored on resume without extra wiring in most cases.
Under the hood SkiaCamera is a wrapper for a SkiaImage DrawnUI control that receives GPU-backed images coming from native camera. This control is accessible via the Display property, so anything SkiaImage supports — blur, tint, shader effects, custom rescaling — is available on the preview surface without subclassing the camera itself.
Sample App
The repo sample exposes almost every relevant camera setting. Plus we have live audio visualizers, OpenAI captions encoded into final video and SKSL filters. UI is built in C# code. A XAML usage example lives in a separate repo: DrawnUI for .NET MAUI Demo.
App UI presents three main parts:
- Top header for fast switching between Photo and Video modes, plus captions controls.
- Middle quick-control overlay with recording actions and a tappable capture thumbnail.
- Bottom drawer provides large camera settings organized into three sections:
Input,Processing, andOutput.
Switching video filters on iPhone, pointed to Youtube video on laptop screen
Input controls camera selection, capture format, and mode. Processing controls realtime work: monitoring, visualizers, gain, and speech recognition. Output controls what gets written: audio/video toggles, codec, pre-record settings, and geotagging.
That split makes the full pipeline visible in one place: input, processing, and encoded output.
For this article, the flow is simple: keep realtime processing on, feed live audio into overlay and speech paths, then record the composed result directly into the saved video.
In the sample app, SkiaCamera is subclassed into AppCamera and configured for processed recording by default:
1
2
3
4
5
6
7
8
9
10
11
12
13
14
15
public partial class AppCamera : SkiaCamera
{
	public AppCamera()
	{
		NeedPermissionsSet = NeedPermissions.Camera | NeedPermissions.Gallery | NeedPermissions.Microphone;
		InjectGpsLocation = true;

		UseRealtimeVideoProcessing = true;
		VideoQuality = VideoQuality.Standard;
		EnableAudioRecording = true;

		ProcessFrame = OnFrameProcessing;
		ProcessPreview = OnFrameProcessing;
	}
}
UseRealtimeVideoProcessing = true is the key switch. Without it, recording is native and overlay is preview-only. With it, every frame goes through Skia before encoding, so anything drawn in ProcessFrame becomes part of the file.
Both handlers receive DrawableFrame: it carries the destination SKCanvas, source camera SKImage, current Scale, and IsPreview flag. That flag lets us render preview and recording differently when needed. In the sample we keep one shared overlay tree, keep EQ visible in both paths, and only move captions between preview and recording modes.
Video Recording
The actual recording flow stays straightforward:
1
2
3
4
5
6
7
8
if (CameraControl.IsRecording)
{
	await CameraControl.StopVideoRecording();
}
else
{
	await CameraControl.StartVideoRecording();
}
On success, it moves the final result to the gallery:
1
2
3
4
5
private async void OnVideoRecordingSuccess(object sender, CapturedVideo capturedVideo)
{
	var publicPath = await CameraControl.MoveVideoToGalleryAsync(capturedVideo, MauiProgram.Album);
	_lastSavedVideoPath = publicPath;
}
There is also an abort flow, useful mainly for pre-recording scenarios:
1
await CameraControl.StopVideoRecording(true);
which discards the recording instead of finalizing it.
Pre-Recording: Look-Back
Sometimes we apps miss the moment. Something happens, we tap record - but the time before that tap is gone.
Pre-recording solves this by running a silent circular buffer in memory continuously. Encoded frames keep flowing in and old ones drop off the tail. When you trigger live recording, the buffered segment is prepended to the file before the live feed. The final video contains both - no gap, no cut, no transition artifact.
Works equally well for sports, family moments, wildlife - anything where you can’t predict when live action starts.
That also maps to a security camera pattern: AI or motion detection triggers live recording, the buffer guarantees the seconds before the event are already there - no continuous disk writes, no gigabytes of idle footage.
To enable:
1
2
CameraControl.EnablePreRecording = true;
CameraControl.PreRecordDuration = TimeSpan.FromSeconds(5);
The buffer runs silently in the background from that point on. When the user triggers recording, those last 5 seconds are already there. To abort and discard instead of saving:
1
await CameraControl.StopVideoRecording(true); // true = discard
Both IsPreRecording and IsRecording are bindable, so record button state, labels, and animations wire up directly without extra logic.
For the full breakdown of the muxing flow see PreRecording.md.
SKSL Video Filters
We apply video filters, implemented with SKSL shaders to preview, captured photo and captured video.
Because every frame passes through Skia before encoding, SKSL effects can be applied to recorded video in real-time. The saved MP4 will contain filtered frames, no post-processing needed.
The sample app exposes a VideoEffect helper property on AppCamera:
1
CameraControl.VideoEffect = ShaderEffect.Movie;
AppCamera overrides both RenderPreviewForProcessing and RenderFrameForRecording to apply the selected shader effect before handing frames to preview or encoder. Same effect, same path, different target.
Switch to ShaderEffect.None and you are back to clean capture. Switch mid-session and the filter change shows up in the file from that point forward.
Captured still photo is processed before saving to gallery on GPU thread:
1
2
3
4
5
6
7
8
9
10
11
12
13
14
15
16
17
18
19
private async void OnCaptureSuccess(object sender, CapturedImage captured)
{
	if (CameraControl.UseRealtimeVideoProcessing && CameraControl.VideoEffect != ShaderEffect.None)
	{
		var imageWithEffect = await CameraControl.RenderCapturedPhotoAsync(captured, null, image =>
		{
				var shaderEffect = new SkiaShaderEffect()
				{
					ShaderSource = ShaderEffectHelper.GetFilename(CameraControl.VideoEffect),
				};
				image.VisualEffects.Add(shaderEffect);
		}, true);

		captured.Image.Dispose();
		captured.Image = imageWithEffect;
	}

	SaveFinalPhotoInBackground(captured);
}
This is from MainPage.OnCaptureSuccess in the sample app.
The sample ships with several SKSL presets to play with, and adding your own is a matter of writing a standard SKSL fragment shader.
Shader assets live in the sample under src/Sample/Resources/Raw/Shaders.
Drawn Overlay
SkiaCamera virtual methods RenderPreviewForProcessing or RenderFrameForRecording are used to prepare the SkCanvas that would then be passed to callbacks ProcessPreview or ProcessFrame so we could optionally draw over the frames.
Inside callbacks we can of course use SkiaSharp primitives like SKCanvas.DrawText, DrawRect, and others.
When drawing some complex controls we can compose overlays with DrawnUI layouts.
Our overlay contains two visible modules:
- an audio visualizer panel in the top-right corner
- a captions panel rendered with
SkiaRichLabel
1
2
3
4
5
6
7
8
9
10
11
12
13
14
15
16
17
18
19
20
21
new SkiaShape()
{
	Type = ShapeType.Rectangle,
	UseCache = SkiaCacheType.ImageDoubleBuffered,
	Margin = 16,
	Padding = new Thickness(12, 10, 12, 12),
	WidthRequest = 220,
	HeightRequest = 138,
	CornerRadius = 22,
	VerticalOptions = LayoutOptions.Start,
	HorizontalOptions = LayoutOptions.End,
	Children =
	{
		new AudioVisualizer()
		{
			Margin = new Thickness(0, 42, 0, 0),
			HorizontalOptions = LayoutOptions.Fill,
			VerticalOptions = LayoutOptions.Fill,
		}
	}
}
Notice we used ImageDoubleBuffered cache type for equalizer so that it doesn’t slow our frame rendering, Cache would then calculate/draw in background while we fast-draw the last raster.
The EQ panel can stay where it is for both preview and recording. Captions are different. During preview the app HUD is large and sits over the lower part of the camera feed, so bottom-aligned captions would fight with the controls. For that reason the sample centers the captions panel vertically while drawing preview frames, then moves it back toward the bottom for recorded frames.
Code locations in sample app:
- Overlay composition and captions visual effects:
src/Sample/UI/FrameOverlay.cs - Overlay rendering and scaling against frame data:
src/Sample/UI/AppCamera.cs(DrawOverlayandOnFrameProcessing) - Captions feed and transcription wiring:
src/Sample/UI/MainPage.cs - Caption rolling-window state and timers:
src/Sample/Services/RealtimeCaptionsEngine.cs
In AppCamera.DrawOverlay, we adapt both by mode and scale. layout.AdaptLayoutToMode(frame.IsPreview) switches preview vs recording caption placement, and overlayScale is computed from frame.Scale plus camera format so the same layout stays visually stable across preview and encoded frames.
To know the camera control location on the SkiaSharp canvas we can use camera property
SKRect DrawingRect. When propertyAspectis not set toFillbut rather toFitwe could have “black bars” around the real displayed frame, but then we can useSKRect DisplayRectproperty to get exact area where rescaled preview is drawn on the canvas.
AI Speech Captions
In an upcoming article we will detect faces in realtime, today let’s transcribe speech with the help of OpenAI Whisper model and encode captions into the final video in real-time.
Service lives in src/Sample/Services/OpenAi/OpenAiAudioTranscriptionService.cs.
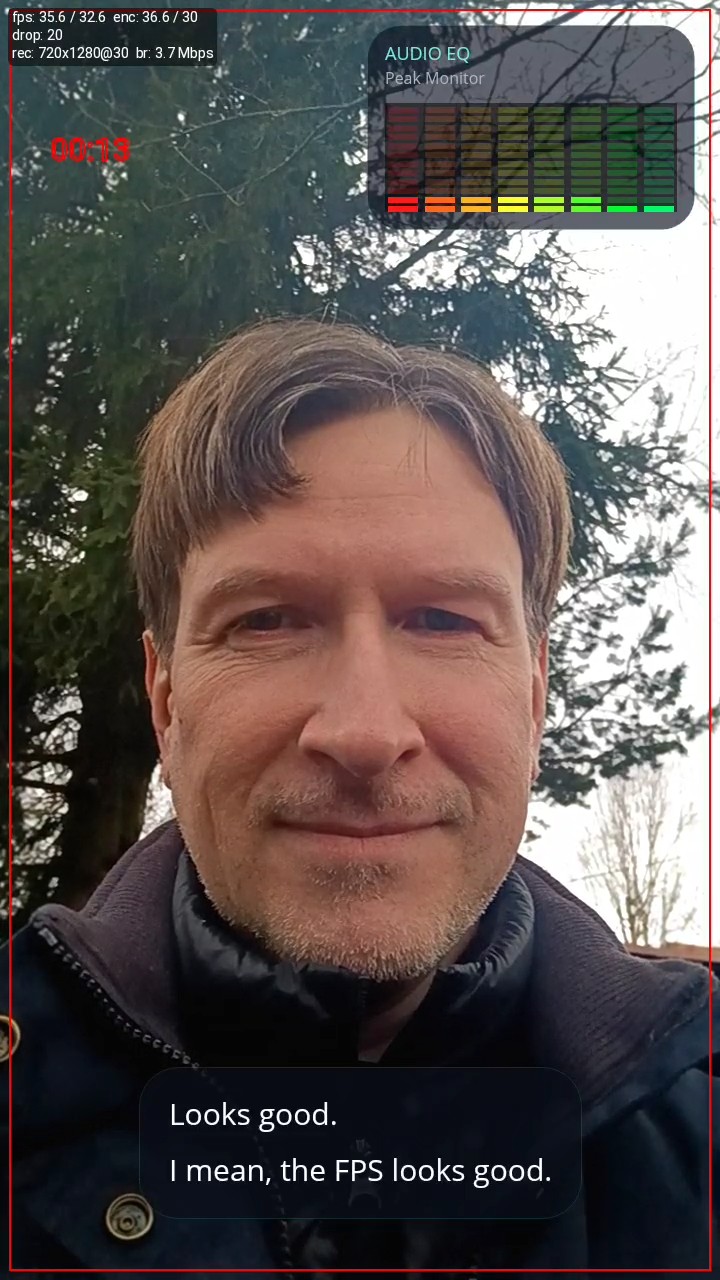
Author testing captions on Android, frame from a final video with debug info
In the previous article we talked in detail about how to get audio from SkiaCamera. Let’s wire transcription like this:
1
2
CameraControl.AudioSampleAvailable += (data, rate, bits, channels)
    => OnAudioCaptured(data, rate, bits, channels);
Then feed incoming PCM into the service:
1
2
3
4
5
6
7
8
9
10
11
12
13
14
15
private void OnAudioCaptured(byte[] data, int rate, int bits, int channels)
{
	if (_realtimeTranscriptionService != null && IsSpeechEnabled)
	{
		if (rate != _lastAudioRate || bits != _lastAudioBits || channels != _lastAudioChannels)
		{
			_lastAudioRate = rate;
			_lastAudioBits = bits;
			_lastAudioChannels = channels;
			_realtimeTranscriptionService.SetAudioFormat(rate, bits, channels);
		}

		_realtimeTranscriptionService.FeedAudio(data);
	}
}
To enable AI captions for your compiled sample, open src/Sample/Secrets.cs and paste your OpenAI key:
1
public static string OpenAiKey = "sk-...";
Without a key the sample compiles and runs normally but AI captions will be disabled.
We wire received text onto our frame overlay like this:
1
2
3
_captionsEngine.CaptionsChanged += spans =>
	MainThread.BeginInvokeOnMainThread(()
        => _previewFrameOverlay.SetCaptions(spans));
Since all video frames come to us in a form of a SkiaSharp canvas we comfortably draw captions with DrawnU:
1
2
3
4
5
6
7
8
9
10
11
12
13
14
15
16
17
18
19
20
21
new SkiaShape()
{
	UseCache = SkiaCacheType.Image,
	Type = ShapeType.Rectangle,
	CornerRadius = 26,
	Margin = new Thickness(20, 0, 20, 40),
	Padding = new Thickness(20, 16, 20, 18),
	HorizontalOptions = LayoutOptions.Center,
	VerticalOptions = LayoutOptions.End,
	Children =
	{
		new SkiaRichLabel()
		{
			FontFamily = "FontText",
			FontSize = 20,
			LineHeight = 1.1,
			TextColor = Colors.White,
			UseCache = SkiaCacheType.Operations,
		}
	}
}
Captions are managed by RealtimeCaptionsEngine. Each paragraph is kept until either a newer paragraph is pushed, or the most recently added paragraph’s timer expires. When the last paragraph’s timer finally expires, we apply a shader to dissolve it with a nice effect:
1
2
3
4
5
6
7
8
9
10
11
12
13
14
15
16
17
18
19
void AnimateOut(SkiaControl control)
{
	var animExit = new AnimatedShaderEffect()
	{
		UseBackground = PostRendererEffectUseBackgroud.Once,
		ShaderSource = MauiProgram.ShaderRemoveCaption,
		DurationMs = 400
	};

	animExit.Completed += (s, e) =>
	{
		control.VisualEffects.Remove(animExit);
		control.DisposeObject(animExit);
		control.IsVisible = false;
	};

	control.VisualEffects.Add(animExit);
	animExit.Play();
}
The full version in FrameOverlay.cs also cancels any in-flight exit animation before starting a new one, so rapid ON/OFF toggles don’t stack effects on the panel.
Since the same overlay handles both preview and recording, captions stay visible live and are burned into the final video with no second export pass. The only layout difference is where they sit: centered during preview so the app HUD does not cover them, then bottom-aligned in the recorded output.
GPS and Metadata
You can enable location tagging with one flag:
1
InjectGpsLocation = true;
Call RefreshGpsLocation when the camera turns on so coordinates are fresh before recording starts:
1
2
if (CameraControl.InjectGpsLocation)
    _ = CameraControl.RefreshGpsLocation();
GPS is then embedded automatically - into the MP4 container for video, and into EXIF for photos. No need to set the coordinates manually, they’re already there. Note that whether GPS is displayed depends on the gallery or player reading the file.
For video you can also stamp branding fields into the container metadata:
1
2
3
4
5
6
7
// CameraControl.RecordingSuccess += OnRecordingSuccess;
private async void OnRecordingSuccess(object sender, CapturedVideo capturedVideo)
{
	capturedVideo.Meta.Vendor = "Me";
	capturedVideo.Meta.Software = "My App";
	var publicPath = await CameraControl.MoveVideoToGalleryAsync(capturedVideo, MauiProgram.Album);
}
Captured photos get the full EXIF treatment: ISO, shutter speed, aperture, focal length, orientation, GPS, timestamp, software, vendor, model. The Metadata model exposes all of it before you save:
1
2
3
4
5
6
// CameraControl.CaptureSuccess += OnCaptureSuccess;
private async void OnCaptureSuccess(object sender, CapturedImage captured)
{
	captured.Meta.Software = "My App";
	var path = await CameraControl.SaveToGalleryAsync(captured, "MyAppAlbum");
}
Final thoughts
If your app needs branded recording, AI-assisted media, sports telemetry, guided capture, captions, or audio-reactive overlays, this control is designed for that class of workflow.
If you build something cool with it, please let me know. I’d be happy to see this work was helpful to the others. PRs are also welcome!
Links and resources
- DrawnUi.Maui.Camera - SkiaCamera control repository with sample app and documentation
- DrawnUi.Maui.Demo - a XAML/MVVM example of using SkiaCamera for taking photos
- Real-Time Camera Filters - earlier post about using SKSL shaders with SkiaCamera with example app
- Building a Real-time Audio Processing App - earlier post about using SkiaCamera for audio with example app
- DrawnUI for .NET MAUI - rendering engine OSS repo behind this control
- SkiaSharp - the underlying 2D graphics library which made this all possible
The author is available for consulting and works on drawn applications and custom controls for .NET MAUI. If you need help custom UI experiences, optimizing performance or building drawn mobile apps, feel free to reach out.